A custom ESPHome component that adds remote screenshots to any ESP32 display over HTTP.
Add it to your device's YAML config alongside your existing display setup, compile and flash as normal, and your device's built-in web server gains a new /screenshot endpoint. It serves a pixel-perfect BMP of the live framebuffer, switches pages remotely with ?page=N, and exposes a JSON info endpoint for discovering available pages.
Open the URL in any browser to see the screenshot directly:
http://<YOUR-DEVICE-IP>/screenshot
Or save it from the command line:
# Linux / macOS / Windows (Command Prompt)
curl -o screenshot.bmp http://<YOUR-DEVICE-IP>/screenshot

# Windows (PowerShell)
Invoke-WebRequest -Uri http://<YOUR-DEVICE-IP>/screenshot -OutFile screenshot.bmpIf you're building display UIs on ESPHome, the dev cycle is painful: edit YAML, compile, upload, walk over, squint at a small TFT, walk back, repeat. This component lets you see what's on screen from anywhere -- just open a URL in your browser.
With these screenshots you can:
- Let your coding agent close the loop. After every display lambda change, Claude Code / Codex / Gemini / your coding agent of choice can
curla screenshot, view the BMP, and verify the layout looks right -- without you ever looking at the device. This is the use case that prompted the component: AI-assisted display development where the agent can check its own work. - Monitor ESPHome devices remotely. Expose the endpoint through ngrok or a Cloudflare tunnel and see what your device is displaying from anywhere. Useful for devices mounted on walls, inside enclosures, or at a different site entirely. No VPN needed.
- Integrate with Home Assistant. Fire a webhook that fetches the screenshot and posts it to a notification, Lovelace card, or Telegram bot. "What does the controller screen say right now?" -- answered without leaving the couch.
- Auto-generate documentation. Script a loop that hits
/screenshot/infoto discover all pages, captures each one, and dumps them into a docs folder. Re-run after every UI change and your docs stay current. - Run visual regression tests. Capture baseline screenshots, make changes, capture again, diff. Catch layout breakage before it ships.
- Debug remotely. "The display looks wrong" -- now you can see exactly what they see without asking them to photograph their screen.
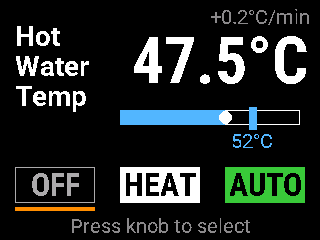
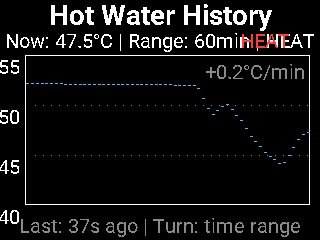
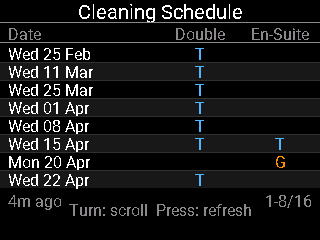
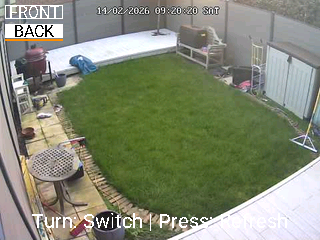
These were captured from a hot water controller built with an ESP32-S3 and a ST7789V 240x320 TFT (rotated to landscape), driven by a rotary encoder.

The device has 6 pages managed via a globals<int>. Each image was fetched with a single HTTP request to /screenshot?page=N and converted from BMP to PNG.
 |
 |
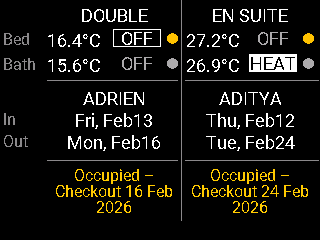 |
| Page 0 -- Main | Page 1 -- History | Page 2 -- Guest Info |
 |
 |
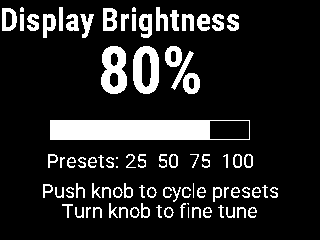 |
| Page 3 -- Cleaning Schedule | Page 4 -- Camera | Page 5 -- Display Brightness |
To capture a specific page, add ?page=N to the URL -- in your browser or from the command line:
# Capture all pages in a loop
for p in 0 1 2 3 4 5; do
  curl -s -o "page${p}.bmp" "http://<YOUR-DEVICE-IP>/screenshot?page=${p}"
doneThree page modes, covering every common ESPHome display pattern:
| Mode | Config | How it works |
|---|---|---|
| Single screen | Just display_id |
Captures whatever's on screen. No page switching. |
| Native pages | pages: [page_main, ...] |
Uses ESPHome's built-in pages: system. Switches with ?page=N. |
| Global-based pages | page_global: current_page |
For UIs that track the current page with a globals int. |
Two HTTP endpoints:
| Endpoint | Returns |
|---|---|
GET /screenshot[?page=N] |
24-bit BMP image of the display |
GET /screenshot/info |
JSON with page count, dimensions, mode, and page names |
Open any of these in your browser, or use curl to save to a file:
http://<YOUR-DEVICE-IP>/screenshot            # current screen
http://<YOUR-DEVICE-IP>/screenshot?page=2     # specific page
http://<YOUR-DEVICE-IP>/screenshot/info        # JSON metadata
curl -o screenshot.bmp http://<YOUR-DEVICE-IP>/screenshot
curl -o page2.bmp "http://<YOUR-DEVICE-IP>/screenshot?page=2"
curl http://<YOUR-DEVICE-IP>/screenshot/info
# {"pages":3,"width":320,"height":240,"mode":"native_pages","page_names":["Main","Graph","Settings"]}- ESP32 with PSRAM -- ESP32-S3, ESP32-S2, or ESP32 WROVER. The ~225 KB BMP buffer is allocated in PSRAM. Regular ESP32 without PSRAM won't work.
- Display using RGB565 -- any
DisplayBuffersubclass inBITS_16colour mode (ILI9XXX, ST7789V, ILI9341, ILI9488, etc.) web_servercomponent enabled -- the screenshot endpoint hooks into ESPHome's built-in web server
You only need to edit your ESPHome YAML file. The
.hand.cppfiles are the component source -- don't modify them. All configuration is done in YAML.The examples below use placeholder values you'll need to replace:
<YOUR-DEVICE-IP>-- your ESP32's IP address (find it in ESPHome logs or your router's DHCP table)my_display-- theidof your display component in your YAMLyour-device.yaml-- your ESPHome YAML filename
Option A -- Reference it directly from GitHub in your YAML (easiest):
No download needed -- ESPHome fetches the component automatically at compile time:
external_components:
  - source:
      type: git
      url: https://github.com/ay129-35MR/esphome-display-screenshot
    components: [display_capture]
Option B -- Download and copy the files manually:
Download the repo from GitHub and copy the display_capture folder into your ESPHome components/ directory:
your-esphome-config/
  components/
    display_capture/
      __init__.py              <-- component source (don't edit)
      display_capture.h        <-- component source (don't edit)
      display_capture.cpp      <-- component source (don't edit)
  your-device.yaml             <-- YOUR config (edit this)
Option C -- Clone with git:
cd /path/to/your/esphome/config
git clone https://github.com/ay129-35MR/esphome-display-screenshot.git components/display_captureIf you don't already have this in your YAML, add it:
web_server:
port: 80If you used Option B or C (local files), add this to your YAML:
external_components:
  - source:
      type: local
      path: components
If you used Option A (git), you already did this in step 1.
Pick the config that matches your setup (see Which page mode do I need? below):
# Simplest -- just capture whatever's on screen
display_capture:
display_id: my_display # <-- change to match YOUR display's idCompile and flash your device the way you normally would:
- Home Assistant ESPHome add-on: Open the ESPHome dashboard in HA, click the three-dot menu on your device, and hit Install.
- ESPHome web dashboard: Click Install → Wirelessly (or Plug into this computer for first flash).
- CLI:
esphome run your-device.yaml
Once it's running, open http://<YOUR-DEVICE-IP>/screenshot in any browser -- you'll see (or download) a BMP of your display. Or from the command line:
# Linux / macOS
curl -o screenshot.bmp http://<YOUR-DEVICE-IP>/screenshot

# Windows (PowerShell)
Invoke-WebRequest -Uri http://<YOUR-DEVICE-IP>/screenshot -OutFile screenshot.bmp
That's it. You should see a pixel-perfect BMP of your display.
Look at how your display is set up in YAML and pick the matching config:
# Your display config probably looks like:
display:
  - platform: ili9xxx
    id: my_display
    lambda: |-
      it.printf(10, 10, id(font), "Hello World");

# Just add this:
display_capture:
  display_id: my_display
?page=N is ignored in this mode -- there's only one screen to capture.
# Your display config probably looks like:
display:
  - platform: ili9xxx
    id: my_display
    pages:
      - id: page_main
        lambda: |-
          it.printf(10, 10, id(font), "Main");
      - id: page_graph
        lambda: |-
          // graph code...
      - id: page_settings
        lambda: |-
          it.printf(10, 10, id(font), "Settings");

# List the same page IDs here:
display_capture:
  display_id: my_display
  pages:
    - page_main
    - page_graph
    - page_settings
  page_names: ["Main", "Graph", "Settings"]  # optional, shows up in /info
Now ?page=0 captures page_main, ?page=1 captures page_graph, etc.
This is common in complex UIs where a rotary encoder or button sets an integer and the display lambda switches on it.
# Your globals probably look like:
globals:
  - id: current_page
    type: int
    restore_value: no
    initial_value: '0'

# And your display lambda does something like:
# if (id(current_page) == 0) { ... } else if (id(current_page) == 1) { ... }

# Point display_capture at the global:
display_capture:
  display_id: my_display
  page_global: current_page
  sleep_global: is_sleeping     # optional -- if you have a sleep/screensaver global
  page_names: ["Main", "History", "Settings"]  # optional
Note: pages and page_global are mutually exclusive -- ESPHome will reject your config if you specify both.
Once running, your device exposes two new HTTP endpoints:
Returns a 24-bit BMP image of the current display. Open in a browser or save from the command line:
http://<YOUR-DEVICE-IP>/screenshot
curl -o screenshot.bmp http://<YOUR-DEVICE-IP>/screenshotSwitches to page N (0-indexed), captures it, then switches back. The physical display flashes briefly (~50ms).
http://<YOUR-DEVICE-IP>/screenshot?page=2
curl -o page2.bmp "http://<YOUR-DEVICE-IP>/screenshot?page=2"To save all pages at once:
for p in 0 1 2 3; do
  curl -s -o "page${p}.bmp" "http://<YOUR-DEVICE-IP>/screenshot?page=${p}"
doneReturns JSON metadata -- useful for scripts that need to discover pages automatically. Open in your browser to see the JSON directly, or fetch with curl:
http://<YOUR-DEVICE-IP>/screenshot/info
curl http://<YOUR-DEVICE-IP>/screenshot/info{
"pages": 3,
"width": 320,
"height": 240,
"mode": "native_pages",
"page_names": ["Main", "Graph", "Settings"]
}| Code | Meaning |
|---|---|
| 200 | Success -- BMP or JSON returned |
| 500 | PSRAM allocation failed (device out of memory) |
| 504 | Main loop didn't respond in 5 seconds (device too busy) |
| Key | Type | Required | Description |
|---|---|---|---|
display_id |
ID | Yes | Your display component's id |
pages |
list of IDs | No | DisplayPage IDs -- for ESPHome native pages |
page_global |
ID | No | globals int that tracks the current page |
sleep_global |
ID | No | globals bool -- wakes display before capture |
page_names |
list of strings | No | Human-readable names for the /screenshot/info endpoint |
PlatformIO's CMake cache doesn't know about the new .cpp file. Do a Clean Build (one-time fix):
- Home Assistant ESPHome add-on / web dashboard: Click the three-dot menu on your device → Clean Build Files, then install again.
- CLI: Delete the cached build files and recompile:
rm -rf .esphome/build/<YOUR-DEVICE>/.pioenvs/<YOUR-DEVICE>/CMakeCache.txt \
       .esphome/build/<YOUR-DEVICE>/.pioenvs/<YOUR-DEVICE>/CMakeFiles/
This only happens once -- subsequent compiles will pick up the file automatically.
The main ESPHome loop didn't respond within 5 seconds. This usually means:
- The device is very busy (heavy sensor polling, large display updates)
- The
display_iddoesn't match your actual display component's ID
PSRAM allocation failed. Check that your board actually has PSRAM and it's enabled in your board config. For ESP32-S3, you may need:
esp32:
  board: esp32-s3-devkitc-1
  framework:
    type: arduino
psram:
mode: octal # or quad, depending on your boardIf you're using sleep_global, make sure the global ID matches the bool your display lambda checks. The component sets it to false before capture, captures, then restores it.
If you're not using sleep, check that your display lambda is actually drawing something (add a test it.fill(Color(255, 0, 0)); to confirm).
The component assumes RGB565 (BITS_16) buffer format, which is the default for ILI9XXX displays. If your display uses a different colour mode, the output will be garbled.
ESPHome's web server runs on a separate FreeRTOS task from the main loop. The display buffer can only be safely accessed from the main loop. The component uses a binary semaphore to coordinate:
HTTP task                                Main loop
----------                               ---------
handleRequest()
  set request_pending_ = true
  xSemaphoreTake(5s timeout)
  ... blocks ...                         loop() sees request_pending_
                                           wake display if sleeping
                                           switch to requested page
                                           display_->update()
                                           read buffer -> BMP in PSRAM
                                           restore original page + sleep
                                           xSemaphoreGive() ---+
  semaphore acquired  <------------------------------------|
  send BMP response
  free PSRAM buffer
DisplayBuffer::buffer_ is protected in ESPHome -- there's no public API to read pixels back. The component uses #define protected public in a separate .cpp translation unit. This is the standard approach for accessing ESPHome internals without forking the framework.
The output BMP always matches what you see on the physical display, regardless of rotation setting. The component applies the inverse of ESPHome's rotation transform when reading pixels back from the buffer.
| Tested on | ST7789V 240x320 @ rotation 90, ESP32-S3 |
| ESPHome | 2025.11.x and later |
| Should work with | Any DisplayBuffer subclass in BITS_16 mode on any PSRAM-equipped ESP32 |
MIT